1.2-BETA-2 has been released! Here are just a few of the new improvements and features that have made their way into this new version:
Advanced outbound NAT fixes
*UPNP now works on LiveCD
*Misc log viewing fixes
*Password field lengths now line up on nervecenter theme
*IPSEC now works correctly on CARP interfaces out of the box
*Routed hosts behind a policy-routed segment can now reach the LAN interface correctly when the anti-lockout rule is enabled
*pfSync and CARP now will work correctly on extremely restrictive rulesets
*Captive portal images fixed
*SLBD 100% utilization fixes
*64 megabyte memory improvements (works but not supported)
*Misc packet capture fixes
*Dashboard package added
*Update static routes on filter reload
*Miniupnpd version bump to 20070521
*Turn off antispoof on bridges
*NAT reflection timeout extended to 2000 which is roughly 33 minutes
*use_rrd_gateway location fixes
*Fixed advanced firewall rule tunables
And the features/fixes that where introduced in 1.2-BETA-1:
*FreeBSD updated to 6.2
*Reworked load balancing pools which allow for round robin or failover
(miniupnpd has proven to work so well that it is now in the base install but deactivated by default (uninstall the miniupnpd package before upgrading to avoid duplicate menu items)
*Much enhanced RRD graphs
*Numerous Squid Package fixes
*PPTP Server includes WINS server settings correctly now
*General OpenVPN stability improvements
*"Nervecenter" theme added as default
*Status -> DHCP leases now 1500% faster
*Captive portal now allows traffic to port 8000 and 8001 behind the scenes
*Multiple miscellaneous pf rule fixes to prevent broken rulesets
*DNS server with active failover will show up when 1.2 releases (Screen shot of test >here<.)
*dnsmasq updated to 2.36
*olsrd updated to 0.4.10
*Alias line item descriptions backported from -HEAD
*Enhanced cron handling backported from -HEAD
*dhclient changes backported from FreeBSD 7
*miniupnpd updated
*Speed NAT apply page up 100%
*PPPoE auto disconnect (for our German users)
*Soekris/WRAP error light usage now when a problem or alert occurs
*TCPDump interface
*VLAN assign interface improvements
*SLBD/load balancing ping times increased to a timeout of 2 seconds
*Package infrastructure to safely sync package data between CARP nodes added
*Miscellaneous DHCP Server OPT interface fixes
*1:1 NAT outgoing FTP fixes
*OpenVPN stability fixes
*Traffic shaper wizard now displays errors correctly
*BandwidthD package added
*Pinger framework improved
*Dynamic filter log viewer added
*IPSec filtering is now possible. You need to create rules before traffic will pass!!
*Individual kill state feature back ported from HEAD on Diagnostics, Show States screen
*Fix for DHCP Load balancing edge case where monitor IP's would be mapped through the wrong gateway.
*Option added to turn off TX and RX hardware checksums. We are finding more and more hardware that this feature just simply doesn't work very well.
*OpenVPN PPPoE fixes
*Reload VLAN interfaces correctly after adding a new one
*Multiple client OpenVPN fixes
*PHP upgraded to 4.4.6
*Synchronized captive portal with m0n0wall
*CARP IP addresses can be used on IPSec VPN connections and multi-WAN IPSec now works correctly
*config.xml stability improvements to drastically reduce chances of corruption
*Packages auto-fix themselves if a problem arises in the installation
*Lighttpd upgraded to 1.4.15
*PPPoE server subnet fixes
*OpenVPN outgoing bandwidth limits added
*Firewall schedules feature added
*Server load balancing pool page added
*Multi-WAN NAT configuration now correct in non-Advanced Outbound NAT mode
*Load balancing ping now uses fping
1.2-BETA-2 will appear at a mirror near you very soon. Please let us know what you think on the forum or mailing list.
** Source from http://pfsense.blogsport.com/
Thursday, July 05, 2007
Thursday, May 10, 2007
.:: Pfsense : Dashboard goodness coming in 1.3 ::.
Though 1.2 is the primary development focus right now, some work is still being done for future releases. One of the coolest changes, in my opinion, upcoming in 1.3 will be changing the front status page into a customizable dashboard.
This feature is still in its early stages, but here is a screenshot to give you an idea of what is being worked on. Aside from the SVG graphs, this is all AJAX so the information, log viewer, etc. all update dynamically without refreshing the entire page.

** Source from http://pfsense.blogsport.com/
Wednesday, May 09, 2007
.:: Pfsense : How To Setup VPN (OpenVPN) : Part 3 ::.
Configuring Remote Access OpenVPN
You already install the OpenVPN client on your PC. Previously, we have create Site To Site Tunnelling between Pfsense. Now we will create the tunnel between Pfsense and the users.
We will use Pfsense2 as our Server to allow VPN user accessing the Pfsense. Remember, we can’t use the port 80 because it already used for Site To Site Tunnelling between Pfsense.
1. Login to Pfsense2
2. Go to VPN (OpenVPN)
3. Click On Server Tab
4. Click the little + sign to create a new VPN tunnel
Now we have some setting like this :
Pfsense2
Protocol : UDP
Dynamic IP : Tick This Option
Local Port : 81
Address Pool : 10.20.200.0/24
Local Network : 10.20.20.0/24
Client-to-client VPN : Tick This Option
Cryptography : BF-CBC (128 bit)
Authentication Method : PKI (Public Key Infrastructure)
CA Certificate : (Paste Your CA certificate That You Already Create It Before)
Server Certificate : (Paste Your Server certificate That You Already Create It Before)
Server Key : (Paste Your Server key That You Already Create It Before)
DH Parameters : (Paste Your DH Parameters That You Already Create It Before)
LZO Compression : Tick This Option
Description : (Put Some Description Here)
5. Click Save to finish configure Pfsense2 as a Server.
After we create the tunneling between Pfsense and users, we have to create a new network interface and named it as “ovpn”
1. Change to C:\Program Files\OpenVPN\bin directory
2. Type “addtap.bat” command
Example Output
C:\Program Files\OpenVPN\bin>addtap.bat
C:\Program Files\OpenVPN\bin>rem Add a new TAP-Win32 virtual ethernet adapter
C:\Program Files\OpenVPN\bin>"C:\Program Files\OpenVPN\bin\tapinstall.exe" install "C:\Program Files\OpenVPN\driver\OemWin2k.inf" tap0801
Device node created. Install is complete when drivers are updated...
Updating drivers for tap0801 from C:\Program Files\OpenVPN\driver\OemWin2k.inf.
Drivers updated successfully.
C:\Program Files\OpenVPN\bin>pause
Press any key to continue . . .
3. Rename a new connection that you just created it as “ovpn”

Figure3 : Creating a New Connection For OpenVPN Client
Now, create a new text file in “c:\program files\openvpn\config folder” (or wherever you installed it) named it as “pfsense.ovpn” (you may change pfsense to whatever you like to describe the tunnel, but keep the ending). Copy and paste the following configuration:
float
port 81
dev tun
dev-node ovpn
proto tcp-client
remote pfsense2 81
ping 10
persist-tun
persist-key
tls-client
ca ca.crt
cert aslahuddin.crt
key aslahuddin.key
ns-cert-type server
comp-lzo
pull
verb 4
** dev-node ovpn must match the name of the renamed new interface,
** pfsense2 is the ip-address of your pfsense box
Remember the client certificates. We need to copy some them over to the “c:\program files\openvpn\config folder”.
In this example we will copy “ca.crt”, “aslahuddin.crt” and “aslahuddin.key” in that folder. You always need “ca.crt” and the proper client files.
Now we are finish configure the remote access for the client. Try this remote access by right click the OpenVPN GUI icon at the right bottom on your PC. The client will try connecting to your pfsense box.
Remote access OpenVPN will show connected if everything perfect. Now the tunnel should now be ready to serve.

Figure4 : Copy the Certificates and Keys at The Folder

Figure5 : Connect Remote Access OpenVPN

Figure6 : Remote Access OpenVPN Connected
Tuesday, May 08, 2007
.:: Pfsense : How To Setup VPN (OpenVPN) : Part 2 ::.
Configuring the VPN Tunnel Between Pfsense (OpenVPN)
After finish creating the certificates and keys for server and clients, now we will setup the VPN tunnel on each pfsense. We will configure Pfsense2 as a Server and Pfsense1 as a client side of the tunnel.
1. Login to Pfsense2
2. Go to VPN (OpenVPN)
3. Click On Server Tab
4. Click the little + sign to create a new VPN tunnel
Now we have some setting like this :
Pfsense2
Protocol : UDP
Dynamic IP : Tick This Option
Local Port : 80
Address Pool : 10.20.100.0/24
Remote Network : 10.0.0.0/16
Cryptography : BF-CBC (128 bit)
Authentication Method : Shared Key
Shared Key : (Paste Your Shared Key That You Already Create It Before. Must Be Same For Both Pfsense)
Description : (Put Some Description Here)
5. Click Save to finish configure Pfsense2 as a Server.

Figure1 : Tunnels Configuration For Pfsense2
Now we will setup Pfsense1 as a client side of the tunnel.
1. Login to Pfsense1
2. Go to VPN (OpenVPN)
3. Click On Client Tab
4. Click the little + sign to create a new VPN tunnel
Now we have some setting like this :
Pfsense1
Protocol : UDP
Server Address : 10.10.100.223
Local Port : 80
Interface IP : 10.0.100.0/24
Remote Network : 10.20.20.0/24
Cryptography : BF-CBC (128 bit)
Authentication Method: Shared Key
Shared Key : (Paste Your Shared Key That You Already Create It Before. Must Be Same For Both Pfsense)
Description : (Put Some Description Here)
5. Click Save to finish configure Pfsense1 as client side of the tunnel.

Figure2 : Tunnels Configuration For Pfsense1
Monday, May 07, 2007
.:: Pfsense : How To Setup VPN (OpenVPN) : Part 1 ::.
Previously, i'm already show you all on how to create IPSec between 2 Pfsense. Now, i will describe on how to create VPN using OpenVPN.
Setting Up VPN On Pfsense (OpenVPN and OpenVPN Client)
Requirements :
• 2 unit of Soekris or pc install with Pfsense
Network Diagram :

Network Setting On Pfsense
Pfsense1 :
WAN IP : 10.10.100.222
LAN IP : 10.0.0.1
Gateway IP : 10.10.100.221
Pfsense2 :
WAN IP : 10.10.100.223
LAN IP : 10.20.20.1
Gateway IP : 10.10.100.221
Creating The Certificates and Keys
Before we can proceed to configure the tunnel and remote access for OpenVPN, we have to create some certificates and keys for the servers and for a few clients.
I will create certificates and keys using windows. Download the latest release of OpenVPN from :
http://www.openvpn.se/download.html
Or u can download it here :
OpenVPN :
http://www.sharebigfile.com/file/162426/openvpn-2-0-9-gui-1-0-3-install-exe.html
Once u download it, install it on your pc and follow the instruction to finish the installation. After finish the installation, you have to follow some step to in order to create the certificates and keys.
First use the command prompt and change to
C:\Program Files\OpenVPN\easy-rsa directory. Run init-config.bat command.
Next, edit vars.bat to adapt it to your environment, and create the directory that will hold your key files.
To generate TLS keys:
Create new empty index and serial files (once only)
1. Type “vars.bat” command
2. Type “clean-all.bat” command
Example Output
C:\Program Files\OpenVPN\easy-rsa>vars.bat
C:\Program Files\OpenVPN\easy-rsa>clean-all.bat
1 file(s) copied.
1 file(s) copied.
To build a CA key (once only)
1. Type “vars.bat” command
2. Type “build-ca.bat” command
Example Output
C:\Program Files\OpenVPN\easy-rsa>vars.bat
C:\Program Files\OpenVPN\easy-rsa>build-ca.bat
Loading 'screen' into random state - done
Generating a 1024 bit RSA private key
.......++++++.....................................................++++++
writing new private key to 'keys\ca.key'
-----
You are about to be asked to enter information that will be incorporated into your certificate request.
What you are about to enter is what is called a Distinguished Name or a DN.
There are quite a few fields but you can leave some blank
For some fields there will be a default value,
If you enter '.', the field will be left blank.
-----
Country Name (2 letter code) [US]:MY
State or Province Name (full name) [CA]:KL
Locality Name (eg, city) [SanFrancisco]:Kuala Lumpur
Organization Name (eg, company) [FortFunston]:MCSB
Organizational Unit Name (eg, section) [ ]:VOIP
Common Name (eg, your name or your server's hostname) [ ]:pfkl2
Email Address [mail@host.domain]:aslah@mcsb.com
To build a DH file (for server side, once only)
1. Type “vars.bat” command
2. Type “build-dh.bat” command
Example Output
C:\Program Files\OpenVPN\easy-rsa>vars.bat
C:\Program Files\OpenVPN\easy-rsa>build-dh.bat
Loading 'screen' into random state - done
Generating DH parameters, 1024 bit long safe prime, generator 2
This is going to take a long time
...........................................+................................
.......................................................+....................
...+.......................................+................................
.................+..........................................................
..........................................++*++*++*
To build a private key/certificate for the OpenVPN server
1. Type “vars.bat” command
2. Type “build-key-server.bat” command
Example Output
C:\Program Files\OpenVPN\easy-rsa>vars.bat
C:\Program Files\OpenVPN\easy-rsa>build-key-server.bat pfkl2
Loading 'screen' into random state - done
Generating a 1024 bit RSA private key
..............................++++++................++++++
writing new private key to 'keys\pfkl2.key'
-----
You are about to be asked to enter information that will be incorporated into your certificate request.
What you are about to enter is what is called a Distinguished Name or a DN.
There are quite a few fields but you can leave some blank
For some fields there will be a default value,
If you enter '.', the field will be left blank.
-----
Country Name (2 letter code) [US]:MY
State or Province Name (full name) [CA]:KL
Locality Name (eg, city) [SanFrancisco]:Kuala Lumpur
Organization Name (eg, company) [FortFunston]:MCSB
Organizational Unit Name (eg, section) [ ]:VOIP
Common Name (eg, your name or your server's hostname) [ ]:pfkl2
Email Address [mail@host.domain]:aslah@mcsb.com
Please enter the following 'extra' attributes to be sent with your certificate request
A challenge password [ ]:password
An optional company name [ ]:MCSB
Using configuration from openssl.cnf
Loading 'screen' into random state - done
Check that the request matches the signature
Signature ok
The Subject's Distinguished Name is as follows
countryName :PRINTABLE:'MY'
stateOrProvinceName :PRINTABLE:'KL'
localityName :PRINTABLE:'Kuala Lumpur'
organizationName :PRINTABLE:'MCSB'
organizationalUnitName :PRINTABLE:'VOIP'
commonName :PRINTABLE:'pfkl2'
emailAddress :IA5STRING:'aslah@mcsb.com'
Certificate is to be certified until May 1 07:06:50 2017 GMT (3650 days)
Sign the certificate? [y/n]:y
1 out of 1 certificate requests certified, commit? [y/n]y
Write out database with 1 new entries
Data Base Updated
To build key files in PEM format (for each client machine)
1. Type “vars.bat” command
2. Type “build-key.bat” command
(use for specific name within script)
Example Output
C:\Program Files\OpenVPN\easy-rsa>vars.bat
C:\Program Files\OpenVPN\easy-rsa>build-key.bat aslahuddin
Loading 'screen' into random state - done
Generating a 1024 bit RSA private key
......................++++++......++++++
writing new private key to 'keys\aslahuddin.key'
-----
You are about to be asked to enter information that will be incorporated into your certificate request.
What you are about to enter is what is called a Distinguished Name or a DN.
There are quite a few fields but you can leave some blank
For some fields there will be a default value,
If you enter '.', the field will be left blank.
-----
Country Name (2 letter code) [US]:MY
State or Province Name (full name) [CA]:KL
Locality Name (eg, city) [SanFrancisco]:Kuala Lumpur
Organization Name (eg, company) [FortFunston]:MCSB
Organizational Unit Name (eg, section) [ ]:VOIP
Common Name (eg, your name or your server's hostname) [ ]:aslahuddin
Email Address [mail@host.domain]:aslah@mcsb.com
Please enter the following 'extra' attributes to be sent with your certificate request
A challenge password [ ]:password
An optional company name [ ]:MCSB
Using configuration from openssl.cnf
Loading 'screen' into random state - done
DEBUG[load_index]: unique_subject = "yes"
Check that the request matches the signature
Signature ok
The Subject's Distinguished Name is as follows
countryName :PRINTABLE:'MY'
stateOrProvinceName :PRINTABLE:'KL'
localityName :PRINTABLE:'Kuala Lumpur'
organizationName :PRINTABLE:'MCSB'
organizationalUnitName : PRINTABLE:'VOIP'
commonName :PRINTABLE:'aslahuddin'
emailAddress :IA5STRING:'aslah@mcsb.com'
Certificate is to be certified until May 1 07:10:59 2017 GMT (3650 days)
Sign the certificate? [y/n]:y
1 out of 1 certificate requests certified, commit? [y/n]y
Write out database with 1 new entries
Data Base Updated
Build shared key for the OpenVPN server (we will used this for Site To Site OpenVPN).
1. Change to C:\Program Files\OpenVPN\bin directory.
2. Type “build openvpn.exe --genkey --secret shared.key” command
Setting Up VPN On Pfsense (OpenVPN and OpenVPN Client)
Requirements :
• 2 unit of Soekris or pc install with Pfsense
Network Diagram :

Network Setting On Pfsense
Pfsense1 :
WAN IP : 10.10.100.222
LAN IP : 10.0.0.1
Gateway IP : 10.10.100.221
Pfsense2 :
WAN IP : 10.10.100.223
LAN IP : 10.20.20.1
Gateway IP : 10.10.100.221
Creating The Certificates and Keys
Before we can proceed to configure the tunnel and remote access for OpenVPN, we have to create some certificates and keys for the servers and for a few clients.
I will create certificates and keys using windows. Download the latest release of OpenVPN from :
http://www.openvpn.se/download.html
Or u can download it here :
OpenVPN :
http://www.sharebigfile.com/file/162426/openvpn-2-0-9-gui-1-0-3-install-exe.html
Once u download it, install it on your pc and follow the instruction to finish the installation. After finish the installation, you have to follow some step to in order to create the certificates and keys.
First use the command prompt and change to
C:\Program Files\OpenVPN\easy-rsa directory. Run init-config.bat command.
Next, edit vars.bat to adapt it to your environment, and create the directory that will hold your key files.
To generate TLS keys:
Create new empty index and serial files (once only)
1. Type “vars.bat” command
2. Type “clean-all.bat” command
Example Output
C:\Program Files\OpenVPN\easy-rsa>vars.bat
C:\Program Files\OpenVPN\easy-rsa>clean-all.bat
1 file(s) copied.
1 file(s) copied.
To build a CA key (once only)
1. Type “vars.bat” command
2. Type “build-ca.bat” command
Example Output
C:\Program Files\OpenVPN\easy-rsa>vars.bat
C:\Program Files\OpenVPN\easy-rsa>build-ca.bat
Loading 'screen' into random state - done
Generating a 1024 bit RSA private key
.......++++++.....................................................++++++
writing new private key to 'keys\ca.key'
-----
You are about to be asked to enter information that will be incorporated into your certificate request.
What you are about to enter is what is called a Distinguished Name or a DN.
There are quite a few fields but you can leave some blank
For some fields there will be a default value,
If you enter '.', the field will be left blank.
-----
Country Name (2 letter code) [US]:MY
State or Province Name (full name) [CA]:KL
Locality Name (eg, city) [SanFrancisco]:Kuala Lumpur
Organization Name (eg, company) [FortFunston]:MCSB
Organizational Unit Name (eg, section) [ ]:VOIP
Common Name (eg, your name or your server's hostname) [ ]:pfkl2
Email Address [mail@host.domain]:aslah@mcsb.com
To build a DH file (for server side, once only)
1. Type “vars.bat” command
2. Type “build-dh.bat” command
Example Output
C:\Program Files\OpenVPN\easy-rsa>vars.bat
C:\Program Files\OpenVPN\easy-rsa>build-dh.bat
Loading 'screen' into random state - done
Generating DH parameters, 1024 bit long safe prime, generator 2
This is going to take a long time
...........................................+................................
.......................................................+....................
...+.......................................+................................
.................+..........................................................
..........................................++*++*++*
To build a private key/certificate for the OpenVPN server
1. Type “vars.bat” command
2. Type “build-key-server.bat
Example Output
C:\Program Files\OpenVPN\easy-rsa>vars.bat
C:\Program Files\OpenVPN\easy-rsa>build-key-server.bat pfkl2
Loading 'screen' into random state - done
Generating a 1024 bit RSA private key
..............................++++++................++++++
writing new private key to 'keys\pfkl2.key'
-----
You are about to be asked to enter information that will be incorporated into your certificate request.
What you are about to enter is what is called a Distinguished Name or a DN.
There are quite a few fields but you can leave some blank
For some fields there will be a default value,
If you enter '.', the field will be left blank.
-----
Country Name (2 letter code) [US]:MY
State or Province Name (full name) [CA]:KL
Locality Name (eg, city) [SanFrancisco]:Kuala Lumpur
Organization Name (eg, company) [FortFunston]:MCSB
Organizational Unit Name (eg, section) [ ]:VOIP
Common Name (eg, your name or your server's hostname) [ ]:pfkl2
Email Address [mail@host.domain]:aslah@mcsb.com
Please enter the following 'extra' attributes to be sent with your certificate request
A challenge password [ ]:password
An optional company name [ ]:MCSB
Using configuration from openssl.cnf
Loading 'screen' into random state - done
Check that the request matches the signature
Signature ok
The Subject's Distinguished Name is as follows
countryName :PRINTABLE:'MY'
stateOrProvinceName :PRINTABLE:'KL'
localityName :PRINTABLE:'Kuala Lumpur'
organizationName :PRINTABLE:'MCSB'
organizationalUnitName :PRINTABLE:'VOIP'
commonName :PRINTABLE:'pfkl2'
emailAddress :IA5STRING:'aslah@mcsb.com'
Certificate is to be certified until May 1 07:06:50 2017 GMT (3650 days)
Sign the certificate? [y/n]:y
1 out of 1 certificate requests certified, commit? [y/n]y
Write out database with 1 new entries
Data Base Updated
To build key files in PEM format (for each client machine)
1. Type “vars.bat” command
2. Type “build-key.bat
(use
Example Output
C:\Program Files\OpenVPN\easy-rsa>vars.bat
C:\Program Files\OpenVPN\easy-rsa>build-key.bat aslahuddin
Loading 'screen' into random state - done
Generating a 1024 bit RSA private key
......................++++++......++++++
writing new private key to 'keys\aslahuddin.key'
-----
You are about to be asked to enter information that will be incorporated into your certificate request.
What you are about to enter is what is called a Distinguished Name or a DN.
There are quite a few fields but you can leave some blank
For some fields there will be a default value,
If you enter '.', the field will be left blank.
-----
Country Name (2 letter code) [US]:MY
State or Province Name (full name) [CA]:KL
Locality Name (eg, city) [SanFrancisco]:Kuala Lumpur
Organization Name (eg, company) [FortFunston]:MCSB
Organizational Unit Name (eg, section) [ ]:VOIP
Common Name (eg, your name or your server's hostname) [ ]:aslahuddin
Email Address [mail@host.domain]:aslah@mcsb.com
Please enter the following 'extra' attributes to be sent with your certificate request
A challenge password [ ]:password
An optional company name [ ]:MCSB
Using configuration from openssl.cnf
Loading 'screen' into random state - done
DEBUG[load_index]: unique_subject = "yes"
Check that the request matches the signature
Signature ok
The Subject's Distinguished Name is as follows
countryName :PRINTABLE:'MY'
stateOrProvinceName :PRINTABLE:'KL'
localityName :PRINTABLE:'Kuala Lumpur'
organizationName :PRINTABLE:'MCSB'
organizationalUnitName : PRINTABLE:'VOIP'
commonName :PRINTABLE:'aslahuddin'
emailAddress :IA5STRING:'aslah@mcsb.com'
Certificate is to be certified until May 1 07:10:59 2017 GMT (3650 days)
Sign the certificate? [y/n]:y
1 out of 1 certificate requests certified, commit? [y/n]y
Write out database with 1 new entries
Data Base Updated
Build shared key for the OpenVPN server (we will used this for Site To Site OpenVPN).
1. Change to C:\Program Files\OpenVPN\bin directory.
2. Type “build openvpn.exe --genkey --secret shared.key” command
Friday, May 04, 2007
.:: Pfsense : 1.2-BETA-1 Released ::.
1.2-BETA-1 has been released! Here are just a few of the new improvements and features that have made their way into this new version:
•FreeBSD updated to 6.2
•Reworked load balancing pools which allow for round robin or failover
•miniupnpd has proven to work so well that it is now in the base install but deactivated by default (uninstall the miniupnpd package before upgrading to avoid duplicate menu items)
•Much enhanced RRD graphs
•Numerous Squid Package fixes
•PPTP Server includes WINS server settings correctly now
•General OpenVPN stability improvements
•"Nervecenter" theme added as default
•Status -> DHCP leases now 1500% faster
•Captive portal now allows traffic to port 8000 and 8001 behind the scenes
•Multiple miscellaneous pf rule fixes to prevent broken rulesets
•DNS server with active failover will show up when 1.2 releases
•dnsmasq updated to 2.36
•olsrd updated to 0.4.10
•Alias line item descriptions backported from -HEAD
•Enhanced cron handling backported from -HEAD
•dhclient changes backported from FreeBSD 7
•miniupnpd updated
•Speed NAT apply page up 100%
•PPPoE auto disconnect (for our German users)
•Soekris/WRAP error light usage now when a problem or alert occurs
•TCPDump interface
•VLAN assign interface improvements
•LBD/load balancing ping times increased to a timeout of 2 seconds
•Package infrastructure to safely sync package data between CARP nodes added
•Miscellaneous DHCP Server OPT interface fixes
•1:1 NAT outgoing FTP fixes
•OpenVPN stability fixes
•Traffic shaper wizard now displays errors correctly
•BandwidthD package added
•Pinger framework improved
•Dynamic filter log viewer added
•IPSec filtering is now possible. You need to create rules before traffic will pass!!
•Individual kill state feature back ported from HEAD on Diagnostics, Show States screen
•Fix for DHCP Load balancing edge case where monitor IP's would be mapped through the wrong gateway.
•Option added to turn off TX and RX hardware checksums. We are finding more and more hardware that this feature just simply doesn't work very well.
•OpenVPN PPPoE fixes
•Reload VLAN interfaces correctly after adding a new one
•Multiple client OpenVPN fixes
•PHP upgraded to 4.4.6
•Synchronized captive portal with m0n0wall
•CARP IP addresses can be used on IPSec VPN connections and multi-WAN IPSec now works correctly
•config.xml stability improvements to drastically reduce chances of corruption
•Packages auto-fix themselves if a problem arises in the installation
•Lighttpd upgraded to 1.4.15
•PPPoE server subnet fixes
•OpenVPN outgoing bandwidth limits added
•Firewall schedules feature added
•Server load balancing pool page added
•Multi-WAN NAT configuration now correct in non-Advanced Outbound NAT mode
•Load balancing ping now uses fping
** Source from http://pfsense.blogsport.com/
Friday, April 27, 2007
.:: Pfsense : How To Setup Vlans ::.
Requirements:
• 1 unit of Soekris or pc install with Pfsense
Setting Vlans On Pfsense
Now we setup the vlans on the pfsense
1. Login to Pfsense
2. Go to Interfaces(assign)
3. Click on the Vlans Tab
4. Click the little + sign to create a new vlan
Now we have some settings like this :
Parent Interface: sis0 (or whatever your LAN)
VLAN Tag: 10
Description: VLAN10
Parent Interface: sis0 (or whatever your LAN)
VLAN Tag: 20
Description: VLAN20
Parent Interface: sis0 (or whatever your LAN)
VLAN Tag: 30
Description: VLAN30
Assign Vlans Interface At Pfsense
Now return to pfsense, and reboot it. Everything should work, we’re just enabling the vlans.
Now login to the pfsense again, go to interfaces(assign), go to interfaces tab, then click the + sign.
You should have:
LAN: sis0
WAN: sis1
OPT1: VLAN 10 on SIS0 (VLAN10)
OPT2: VLAN 20 on SIS0 (VLAN20)
OPT3: VLAN 30 on SIS0 (VLAN30)
Click save. Reboot the pfsense again.

Figure1 : Assign Vlan Interface at Pfsense
Now login to the pfsense again, and change the interface name from OPT1 to VLAN10, and then assign it the ip range 10.0.10.1/24 and click save. Do the same for VLAN20 (10.0.20.1/24) and VLAN30 (10.0.30.1/24)
Now go to the DHCP Server section on the pfsense, and you’ll see a new VLAN10, VLAN20 and VLAN30 at the top, which you can configure.
Make sure it is enabled, then click “Apply Changes”

Figure2 : DHCP Server For Vlan10

Figure3 : DHCP Server For Vlan20

Figure4 : DHCP Server For Vlan30
Setting Up Vlan Routing at Pfsense
After you have done that you will want to configure your firewall rules on the pfsense setup. In this example, Vlan10 can access to Vlan20 and Vlan30. Same as Vlan20, it can access Vlan10 and Vlan30. But for Vlan30, it just can access Vlan20 only.

Figure5 : Vlan10 Rules

Figure6 : Vlan20 Rules

Figure7 : Vlan30 Rules
And now, i'm finish with setup Vlans on Pfsense. U can try it by yourself.
Thursday, April 26, 2007
.:: Pfsense : How To Setup VPN (IPSec and PPTP) ::.
Now, we will go through details on how to setup VPN on pfsense.
Requirements :
• 2 unit of Soekris or pc install with Pfsense
Network Diagram :
Network Setting On Pfsense
Pfsense1 :
WAN IP : 10.10.100.222
LAN IP : 10.0.0.1
Gateway IP : 10.10.100.221
Pfsense2 :
WAN IP : 10.10.100.223
LAN IP : 10.20.20.1
Gateway IP : 10.10.100.221
Configuring the VPN Tunnel Between Pfsense (IPSec)
Now we setup the VPN tunnel on each pfsense
1. Login to Pfsense
2. Go to VPN (IPsec)
3. Click On Tunnels Tab
4. Click the little + sign to create a new VPN tunnel
Now we have some setting like this :
Pfsense1
Interface : WAN
Local Subnet : Type : LAN Subnet
Remote Subnet : 10.20.20.0/24
Remote Gateway : 10.10.100.223
Description : VPN FW 2
Phase1 proposal (Authentication)
Negotiation mode : aggressive
My identifier : My IP address
Encryption algorithm :3DES
Hash algorithm : SHA1
DH key group : 2
Lifetime : 28800
Authentication method : Pre-shared key
Pre-Shared Key : try@try@1234@aslah
Phase 2 proposal (SA/Key Exchange)
Protocol : ESP
Encryption algorithms : 3DES
Hash algorithms : SHA1
PFS key group : 2
Lifetime : 28800

Figure1 : Tunnels Configuration For Pfsense1
Pfsense2
Interface : WAN
Local Subnet : Type : LAN Subnet
Remote Subnet : 10.0.0.0/24
Remote Gateway : 10.10.100.222
Description : VPN FW 1
Phase1 proposal (Authentication)
Negotiation mode : aggressive
My identifier : My IP address
Encryption algorithm :3DES
Hash algorithm : SHA1
DH key group : 2
Lifetime : 28800
Authentication method : Pre-shared key
Pre-Shared Key : try@try@1234@aslah
Phase 2 proposal (SA/Key Exchange)
Protocol : ESP
Encryption algorithms : 3DES
Hash algorithms : SHA1
PFS key group : 2
Lifetime : 28800

Figure2 : Tunnels Configuration For Pfsense2
Configuring Remote Access IPSec VPN (PPTP)
Here we are using PPTP as a remote access VPN. The first thing we want to do is setup the PPTP server. To do this
1. Login to Pfsense
2. Go to VPN (PPTP)
3. Choose “Enable PPTP Server”
Now Pfsense have some setting like this :
Pfsense1
Server address : 10.0.0.252
Remote address range : 10.0.0.192/28
Pfsense2
Server address : 20.20.1.252
Remote address range : 20.20.1.192/28
Then we need to configure PPTP users. To do this
1. Go to VPN (PPTP)
2. Click On Users Tab
3. Click the little + sign to create a new PPTP user
Now Pfsense have some setting like this :
Username : testing
Password : test@test.com
test@test.com (confirmation)
Configure Rules For IPSec Tunnels and PPTP Users
In this example, we allowed any traffic can get through IPSec Tunnels while PPTP users can access everything.

Figure3 : IPSec Rules For Pfsense1

Figure4 : IPSec Rules For Pfsense2

Figure5 : PPTP VPN Rules For Pfsense1

Figure6 : PPTP VPN Rules For Pfsense2
Setting Up a PPTP Client on Windows XP
Here is an example to create a PPTP client on Microsoft XP
1. Accessing the Network Control Panel
2. Click “Create New Connection” in the left hand column of the “Network Connections” window
3. You are now presented with a Wizard. Click Next to continue
4. Select “Connect to the Network at my Workplace” from the menu
5. Select Virtual Private Network connection from the next panel


6. Name the connection
7. Now enter the IP or FQDN of the PPTP Server. (This can be any of the configured interfaces.)


8. If you are the system admin you will be asked if you want this to be for your use only or for anyone’s use. I suggest you limit it to your use only unless you want the VPN network to be made available to all user accounts on the workstation
9. Next you can either just finish or add a shortcut to the desktop. You are nearly done!
10. When you launch the client for the first time (hopefully from the icon you asked it to create from the wizard, if not then you will need to access the “Network Connections” window again and double click your new connection.) you will be asked for a username and password. Click connect when you are done with this and if all goes well you will connect to the PPTP Server

Wednesday, April 25, 2007
.:: Pfsense : How To Install : Part 3 ::.
Installing pfSense to harddrive
After we go through the Initial pfSense configuration, we're ready to install pfsense to the harddrive. Run option 99 from the shellmenu now. The configuration you did will be transferred to the harddrive by the installer.
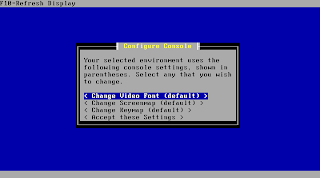
First you get some settings to localize your keyboard or change your console appearance. Change what you need or just go one by accepting the settings.
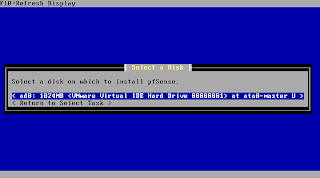
Next pfSense will present a list with detected suitable install medias to you. Please make sure you are not accidently overwriting data you still need. It's recommended to have a dedicated media only for your install. Any other constelations are not officially supported. Choose your media and hit enter to continue.
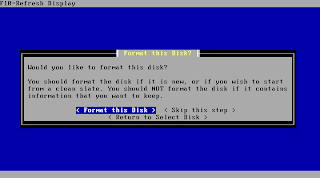
You should format the disk to prepare it for the installation. Beware this will whipe your entire media!
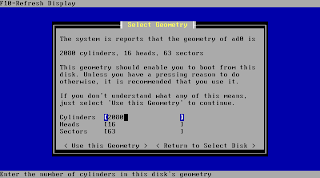
At the next step pfSense will show you the detected drive geometry. You should leave this the way it was detected as long as you don't run into any troubles while installing with these settings. In case you get errors try to alter your bios settings before manually entering values here. Setting your drive from auto to lba or chs in bioas already might help to detect the right settings.
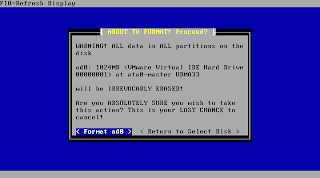
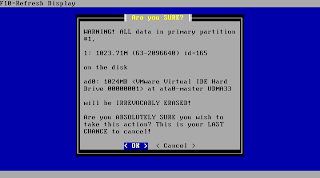
Now you are at the point of no return: Only hit "Format xxX" if you are really sure there is no valuable data left at this media!
The media is now prepared to continue with partitioning. Just hit enter to move on.
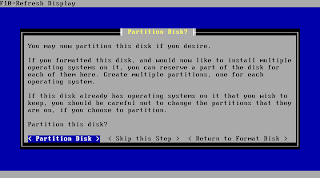
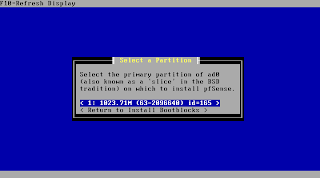
PfSense suggests using the complete space of your drive for the installation. You usually should just keep this setting and move on to the next step.

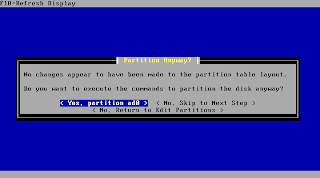
In case your partitioning was the same like before as this is a reinstall confirm the changes.
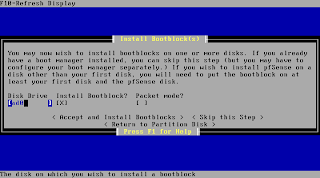
You typically can confirm the following step. If you encounter problems with the bootloader after the installation is done rerun the installation and check "Packet mode" at this screen.
Select the just created partition as target for your installation.
Confirm this step. In case you skipped the above settings this is the point where your data on the media will be overwritten.
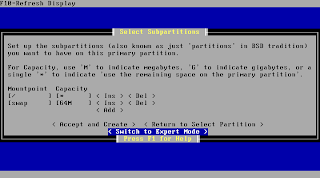
PfSense suggests a setting for your subpartitioning now whcih you usually should just keep.
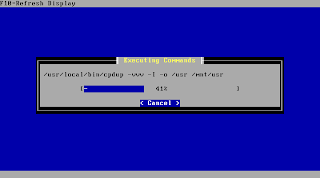
After accepting the above settings pfSense is starting to transfer the system to the prepared media.
You will be asked after a short time to remove the CD and reboot the system to boot your new install.

The system is now going down for reboot and your installation is finished
After we go through the Initial pfSense configuration, we're ready to install pfsense to the harddrive. Run option 99 from the shellmenu now. The configuration you did will be transferred to the harddrive by the installer.
First you get some settings to localize your keyboard or change your console appearance. Change what you need or just go one by accepting the settings.

Next pfSense will present a list with detected suitable install medias to you. Please make sure you are not accidently overwriting data you still need. It's recommended to have a dedicated media only for your install. Any other constelations are not officially supported. Choose your media and hit enter to continue.

You should format the disk to prepare it for the installation. Beware this will whipe your entire media!

At the next step pfSense will show you the detected drive geometry. You should leave this the way it was detected as long as you don't run into any troubles while installing with these settings. In case you get errors try to alter your bios settings before manually entering values here. Setting your drive from auto to lba or chs in bioas already might help to detect the right settings.

Now you are at the point of no return: Only hit "Format xxX" if you are really sure there is no valuable data left at this media!

The media is now prepared to continue with partitioning. Just hit enter to move on.

PfSense suggests using the complete space of your drive for the installation. You usually should just keep this setting and move on to the next step.

In case your partitioning was the same like before as this is a reinstall confirm the changes.

You typically can confirm the following step. If you encounter problems with the bootloader after the installation is done rerun the installation and check "Packet mode" at this screen.

Select the just created partition as target for your installation.

Confirm this step. In case you skipped the above settings this is the point where your data on the media will be overwritten.

PfSense suggests a setting for your subpartitioning now whcih you usually should just keep.

After accepting the above settings pfSense is starting to transfer the system to the prepared media.

You will be asked after a short time to remove the CD and reboot the system to boot your new install.

The system is now going down for reboot and your installation is finished

Monday, April 23, 2007
.:: Pfsense : How To Install : Part 2 ::.
Initial pfSense configuration
Assigning Interfaces
The first time pfSense boots up it will ask you to assign the interfaces if it has not found a config file or interface configuration is different from what was found in the config file.
VLAN's
You now have the option to assign VLANs. If you don't need VLANs or don't know what VLANs are, choose "No" here. VLANs are optional and are only needed for advanced networking. You as well need VLAN-capable equipement if you plan to use it. (Better description and config steps still needed here)
LAN, WAN, OPTx
The first interface it asks you to assign is the LAN interface. If you know the interface you want to assign to LAN, enter the name of the interface like "fxp0" and hit enter.
The second interface you have to assign is the WAN interface. Enter the appropriate interface like "fxp1" and hit enter again.
At least you need two interfaces (LAN and WAN) to setup pfSense. If you have more interfaces available, you can go on and assign them as OPTx interfaces. The procedure is the same like previous one.
Auto Assigning Interface
There is another procedure to assign interfaces which is especially designed if your Nics are all of the same kind and you don't know which physical nic matches which detected nic as they all then will appear for example as fxpX. In this case you simply can enter "a" when you are asked for the nic name.
PfSense now is waiting for a linkup event at one of the nics. Just plug in a cable to the nic you want to assign and wait for the link light to turn on at the nic. Hit enter after that. pfSense has detected the linkup and you can continue with the next interface.
If you have no more interfaces left just hit enter without entering a nic name and apply the settings by confirming them with "y".
Finishing steps
PfSense now will make the finishing touches to configure the interfaces.
After it went through the configuration you'll end up with a shell menu and a number of options.
Assigning Interfaces
The first time pfSense boots up it will ask you to assign the interfaces if it has not found a config file or interface configuration is different from what was found in the config file.
VLAN's
You now have the option to assign VLANs. If you don't need VLANs or don't know what VLANs are, choose "No" here. VLANs are optional and are only needed for advanced networking. You as well need VLAN-capable equipement if you plan to use it. (Better description and config steps still needed here)
LAN, WAN, OPTx
The first interface it asks you to assign is the LAN interface. If you know the interface you want to assign to LAN, enter the name of the interface like "fxp0" and hit enter.
The second interface you have to assign is the WAN interface. Enter the appropriate interface like "fxp1" and hit enter again.
At least you need two interfaces (LAN and WAN) to setup pfSense. If you have more interfaces available, you can go on and assign them as OPTx interfaces. The procedure is the same like previous one.
Auto Assigning Interface
There is another procedure to assign interfaces which is especially designed if your Nics are all of the same kind and you don't know which physical nic matches which detected nic as they all then will appear for example as fxpX. In this case you simply can enter "a" when you are asked for the nic name.
PfSense now is waiting for a linkup event at one of the nics. Just plug in a cable to the nic you want to assign and wait for the link light to turn on at the nic. Hit enter after that. pfSense has detected the linkup and you can continue with the next interface.
If you have no more interfaces left just hit enter without entering a nic name and apply the settings by confirming them with "y".
Finishing steps
PfSense now will make the finishing touches to configure the interfaces.

After it went through the configuration you'll end up with a shell menu and a number of options.

.:: Pfsense : How To Install : Part 1 ::.
There are basically 2 different platforms :
1. Embedded
2. LiveCD / Harddisk Install
1. Embedded
The embedded builds are made for embedded hardware platforms like the popular PC-Engines WRAP and SOEKRIS 4X01 amongst many other suitable platforms.
Writing the image
You can download the embedded image from one of the pfSense mirrors. When using a windows machine the easiest way to write your media is with physdiskwrite.
Place physdiskwrite and the pfSense image in the same folder. Attach the media you want to store pfSense on (i.e. CF-Reader and CF-Card). Then issue the following command:
physdiskwrite pfSense-embedded-x.x.img.gz
Physdiskwrite will show you a numbered list of suitable devices (USB-stick, CF-cards in USB-readers, harddisks,...) . Enter the number of the desired media.
BEWARE: By choosing the wrong destination you might as well whipe one of your harddisks! Check and recheck your selection again!
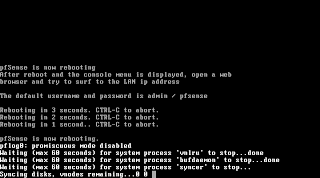
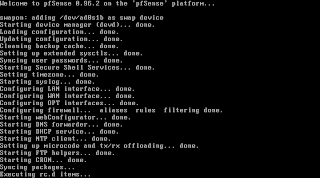
Booting pfSense the first time
After your media was succesfully written place it in your system as bootmedia. Check your BIOS to select the correct bootpriority and configure the device. If everything is configured correctly you should see the kernel beginning to load. At systems with vga the output will stop displaying a "/" at the screen. From that point on all output is at COM1. Please check the bootup process there by using a null modem cable and a terminal program.
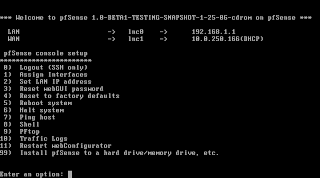
The image has a default config that works with the WRAP and the SOEKRIS. With these platforms simply connect a client to the LAN Interface and it gets an IP by DHCP. You can access pfSense at 192.168.1.1. Logon with user "admin" and password "pfsense". If you are using a direct connect from your client to the pfSense interface remember that you need a crossover cable. For other systems please continue at "Initial pfSense configuration" as you most likely have to assign interfaces before you can access pfSense's webgui.
To download physdiskwrite and the pfSense image, click url below :
Physdiskwrite :
http://www.sharebigfile.com/file/151428/physdiskwrite-exe.html
Pfsense Image :
http://www.sharebigfile.com/file/151427/pfSense-img.html
2. LiveCD / Harddisk Install
U can running pfsense on the pc using the CD as a boot drive. You need a CD-Burner and a CD-Writing application that is capable of writing a CD from an iso file. A system with at least 2 nics and a CDROM to boot from is needed.
The Install option
At the same time the LiveCD is the installer which can setup pfSense to your harddisk. It's recommended that you first configure pfSense before you run the installer (option 99 at the shell menu).
To download LiveCD, click url below :
LiveCD (ISO Format) :
http://www.sharebigfile.com/file/152148/pfSense-1-0-1-LiveCD-Installer-iso-gz.html
1. Embedded
2. LiveCD / Harddisk Install
1. Embedded
The embedded builds are made for embedded hardware platforms like the popular PC-Engines WRAP and SOEKRIS 4X01 amongst many other suitable platforms.
Writing the image
You can download the embedded image from one of the pfSense mirrors. When using a windows machine the easiest way to write your media is with physdiskwrite.
Place physdiskwrite and the pfSense image in the same folder. Attach the media you want to store pfSense on (i.e. CF-Reader and CF-Card). Then issue the following command:
physdiskwrite pfSense-embedded-x.x.img.gz
Physdiskwrite will show you a numbered list of suitable devices (USB-stick, CF-cards in USB-readers, harddisks,...) . Enter the number of the desired media.
BEWARE: By choosing the wrong destination you might as well whipe one of your harddisks! Check and recheck your selection again!
Booting pfSense the first time
After your media was succesfully written place it in your system as bootmedia. Check your BIOS to select the correct bootpriority and configure the device. If everything is configured correctly you should see the kernel beginning to load. At systems with vga the output will stop displaying a "/" at the screen. From that point on all output is at COM1. Please check the bootup process there by using a null modem cable and a terminal program.
The image has a default config that works with the WRAP and the SOEKRIS. With these platforms simply connect a client to the LAN Interface and it gets an IP by DHCP. You can access pfSense at 192.168.1.1. Logon with user "admin" and password "pfsense". If you are using a direct connect from your client to the pfSense interface remember that you need a crossover cable. For other systems please continue at "Initial pfSense configuration" as you most likely have to assign interfaces before you can access pfSense's webgui.
To download physdiskwrite and the pfSense image, click url below :
Physdiskwrite :
http://www.sharebigfile.com/file/151428/physdiskwrite-exe.html
Pfsense Image :
http://www.sharebigfile.com/file/151427/pfSense-img.html
2. LiveCD / Harddisk Install
U can running pfsense on the pc using the CD as a boot drive. You need a CD-Burner and a CD-Writing application that is capable of writing a CD from an iso file. A system with at least 2 nics and a CDROM to boot from is needed.
The Install option
At the same time the LiveCD is the installer which can setup pfSense to your harddisk. It's recommended that you first configure pfSense before you run the installer (option 99 at the shell menu).
To download LiveCD, click url below :
LiveCD (ISO Format) :
http://www.sharebigfile.com/file/152148/pfSense-1-0-1-LiveCD-Installer-iso-gz.html
.:: Pfsense : An Open Source Firewall ::.
Hi. Let's start with Firewall first. I'm implementing an Open Source firewall in my network place. I'm using Pfsense. U can read it more, download it and try it at :
http://www.pfsense.com/
Minimum hardware requirements
All platforms:128 megabytes of ram
Embedded:128 megabyte compact flash card
Full installation:2gb hard drive or larger
LiveCD:USB Keychain for configuration storage
Try it out and have it fun. Later i'll describe a detail step by step installing the firewall.
Welcome
Hi, thanks for drop by, this blog represents my daily technical life and experiences that i encounter. By doing this, i can share, i learn more, the more i learn, the more i share, nice cycle.
Subscribe to:
Posts (Atom)